A “how to transport heavy cables” answer only helps if it reflects what actually breaks in the field: damaged reels, crushed outer wraps, unsafe loads, and shipments that arrive “technically delivered” but unusable on the line.
Different sites ship the same cable in different forms. Carriers get different instructions. The load photos are incomplete. Receiving has no clear disposition rule. The result is avoidable rework, claims disputes, and schedule risk.
This guide gives a decision-grade transport method you can standardize. It starts by locking the shipping unit (reel/drum vs coil vs cut lengths), then moves through the load plan, handling and staging, carrier and route constraints, and a receiving checklist that closes the loop with evidence and clear escalation triggers.
Key Takeaways
Transport method depends on the shipping unit (reel/drum vs coil vs cut lengths). Lock that first.
Build a load plan that controls orientation, blocking, securement, and protection—then verify against axle weights, tie-down ratings, and equipment limits.
Prevent damage at the highest-risk moment: handling and staging (lift points, sling/fork rules, laydown, and yard moves).
Confirm carrier + route constraints early (deck height, axle limits, oversize/overweight, scheduling, and paperwork).
Use a tight receiving checklist to avoid downtime: verify condition, capture proof, and trigger disposition fast.
What Shipping Unit Should You Use For Heavy Cables: Reel/Drum, Coil, Or Cut Lengths?
The shipping unit is the first decision that actually matters. It sets how the cable can be picked, how it can be restrained, how it can be protected, and what “damage” looks like when it arrives. If you pick the wrong unit, the transport plan turns into improvisation, usually at the dock or in the yard.
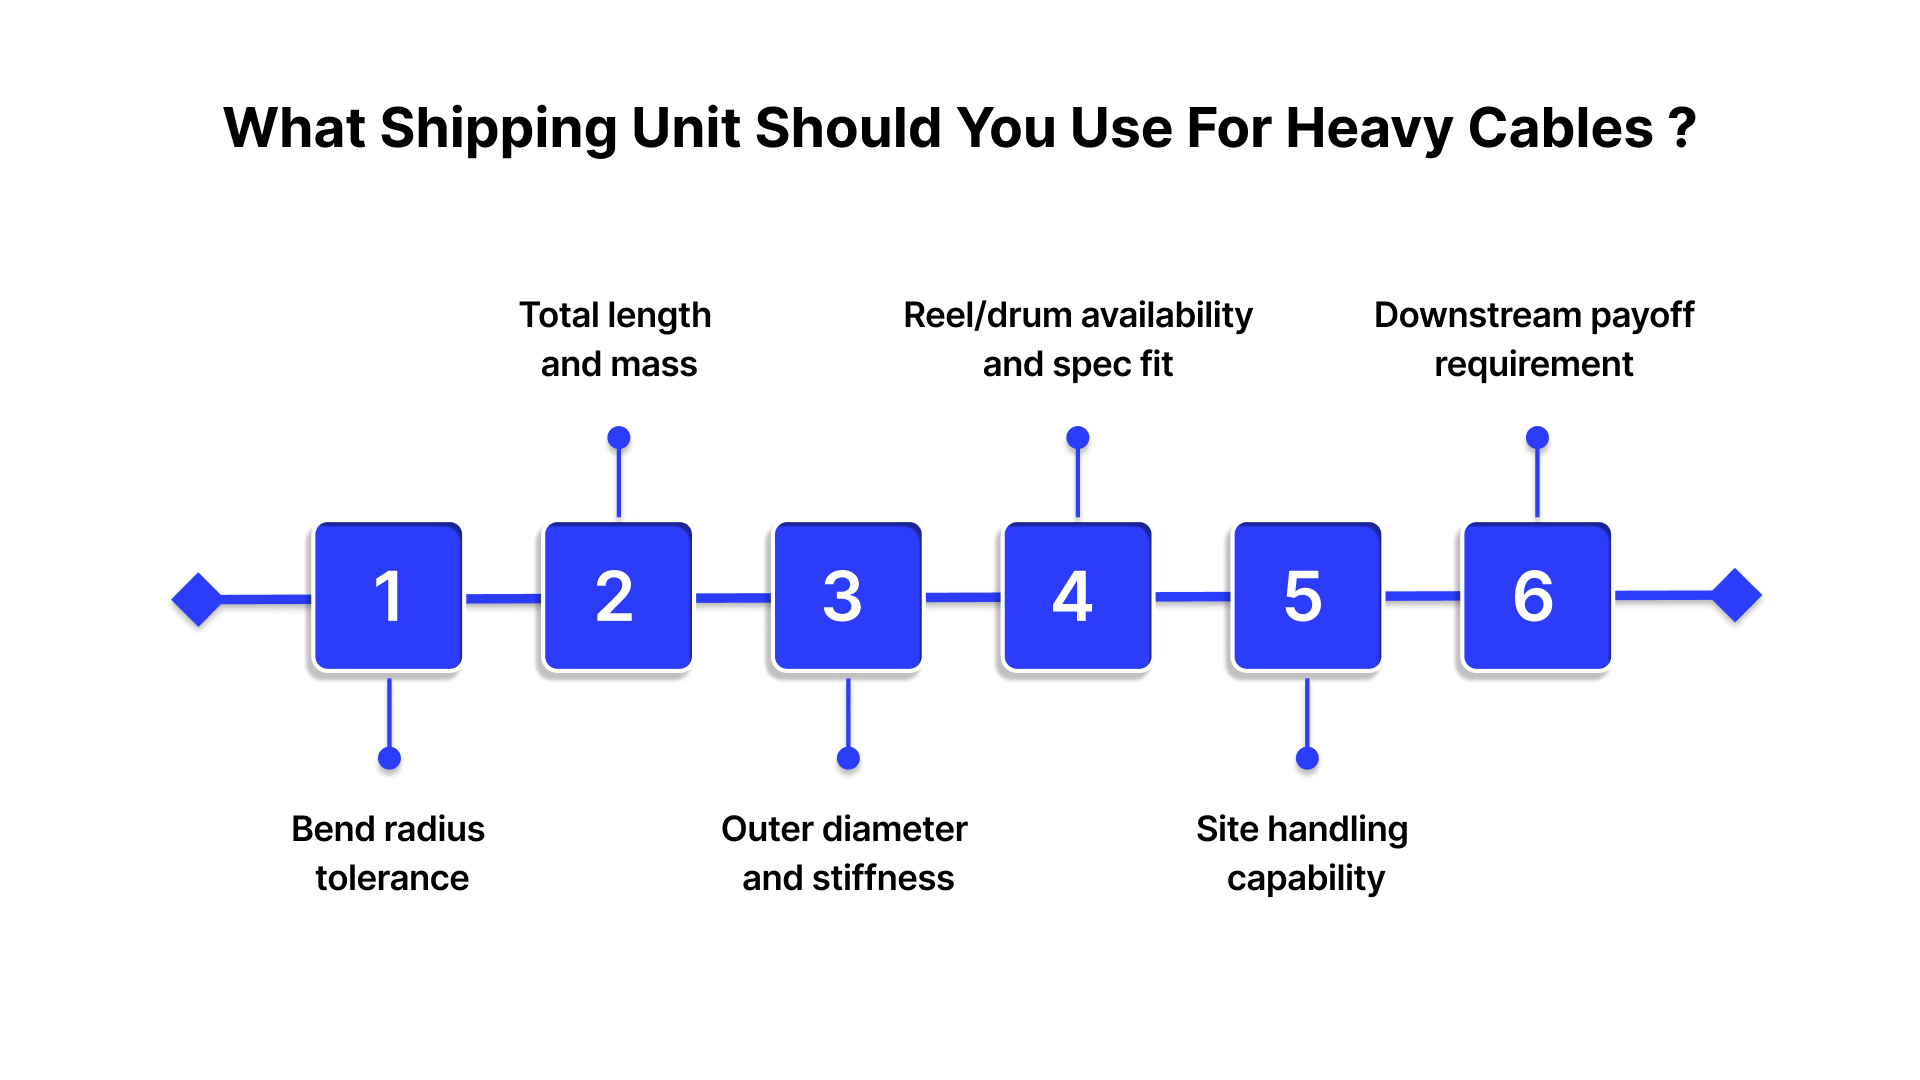
Use these as the minimum screen before anyone books a carrier:
Bend radius tolerance (product + construction). If the cable cannot tolerate tighter bends without performance risk, coils become a controlled exception, not a default.
Total length and mass. Long continuous runs typically push you toward reels/drums because handling events multiply quickly with coils or cut lengths.
Outer diameter and stiffness. Stiffer, larger OD cables hold shape, fight placement, and amplify handling damage when they shift.
Reel/drum availability and spec fit. The “right” shipping unit is not helpful if the correct reel size, arbor interface, or flange condition is not available when production releases.
Site handling capability (ship and receive). If either end lacks the equipment or space to safely move and stage the unit, transport risk becomes a certainty.
Downstream payoff requirement. If the cable must pay off cleanly into installation or processing, that constraint usually dictates reels/drums.
When Reels/Drums Are The Right Answer
Reels/drums are not just a convenience. They are how you control geometry and handling for heavy, high-value cable.
Choose reels/drums when:
The shipment is very heavy, very long, or both.
The cable is damage-sensitive (jacket types that scuff, cut, or deform easily).
You need a repeatable payoff at the destination with minimal intervention.
You cannot accept coil set risk or an inconsistent shape on arrival.
The receiving site needs to move the load through a yard or plant without repeatedly rehandling the cable itself.
Typical failure modes to watch for: flange impacts, reel roll events, rim damage, and end protection failures that turn into cut-back or retermination.
When Coils Are Viable
Coils can work, but only when the product and both sites can control bending and handling.
Coils tend to be viable when:
The weight is moderate enough that the coil can be placed and restrained without crushing lower layers.
Bend radius can be held with controlled coil diameter and consistent placement.
The ship and receive sites can handle coils without “drag-and-dump” moves that grind the jacket or distort the pack.
Protection can be applied in a way that survives yard moves and unloading.
Typical failure modes: coil set, flattened/crushed wraps, scuffed jacket, and end damage from dragging or unsecured ends.
When Cut Lengths Make Sense
Cut lengths are operationally convenient only when the downstream process is already designed for them. Otherwise, they create tracking and rework.
Cut lengths may be appropriate when:
The installation or process uses defined segments and does not require continuous payoff.
Ends can be protected, labeled, and tracked through staging and receiving without confusion.
The risk of wrong length or wrong segment is lower than the risk of moving a heavy reel.
Typical failure modes: mix-ups by length, unprotected ends, missing IDs, and rework from damaged terminations or incorrect sequencing.
Program Rule That Prevents “One-Off” Shipping Decisions
If this is a program, do not leave shipping unit selection to local judgment. Create a short rule set that engineering, procurement, and logistics can apply consistently:
Define 2–3 allowed shipping units per cable family (not per shipment).
Set thresholds that trigger the unit choice (weight, length, OD, minimum bend radius class, payoff requirement).
Add a single exception path with a named approver for edge cases, so exceptions do not become the informal standard.
Shipping unit selection sets the physical constraints. The outcome now depends on how the load is built. Orientation, blocking, securement, and protection are what determine whether it arrives usable.
What Load Plan Prevents Damage And Rework During Transport?
A load plan should read like a reusable spec, not a set of suggestions. It must declare how the shipping unit sits, what prevents movement, where securement is allowed to bear, what gets protected, and what proof is captured before dispatch. If any of those are undefined, the result varies by site, and the load stops being auditable.
Define The Required Orientation By Shipping Unit
Orientation drives the dominant failure mode: roll events, crushed wraps, flange damage, jacket scuffing, and unsafe load shift.
Reels/Drums: Specify upright or on-side by reel family and shipment profile. Do not allow “either.”
Coils: Specify flat or vertical and the minimum support contact points so the coil cannot settle into a pinch or oval.
Cut Lengths: Specify skids/pallets/cradles that prevent bowing and isolate ends from impact.
Control Movement: Blocking + Restraint Requirements
Treat stabilization and restraint as two separate requirements: one prevents roll; the other prevents walk and bounce. Both must be satisfied.
Blocking/chocking: Prevent roll without bearing on the cable pack. Use cradles or dunnage when the unit needs a defined seat, not improvised wedges.
Tie-down zoning: Define restraint zones across the load (front/mid/rear or equivalent) so the unit cannot translate under braking, lane changes, or vibration.
Approved bearing surfaces: Call out where securement may contact (structure, cradles, skid members).
Prohibited practices: No tie-down load over flanges, no strap-to-jacket contact without protection, and no edge contact that can cut or crush outer wraps.
Protect The Known Failure Points
Protection should cover impact surfaces, strap interfaces, and weather exposure—not the entire unit “for appearance.”
Flange/rim and edge protection where straps land and where forklift tines, chains, or deck hardware can strike.
Wrap/seal method suited to expected dwell time and exposure; include a clear requirement for water ingress control when transit or staging can extend.
End protection that prevents crush, contamination, and pull-out during movement.
Verify Weight Distribution Before Release
A load plan is incomplete if it ignores how the weight sits on the deck.
Confirm the planned orientation and support points keep the load within the carrier’s deck capacity and expected axle distribution for the equipment class being booked.
Treat high-mass reels, multi-unit loads, and mixed-unit loads as “confirm required” so carrier confirmation happens before dispatch, not after a rejected pickup.
Capture Dispatch Evidence That Settles Disputes
Make disputes resolvable with a single, repeatable photo set captured before the truck leaves:
Load overview from two angles
Blocking/chocking detail
Close-up of each restraint zone (showing protection at contact points)
Labels/IDs and visible end condition
Any exceptions or deviations documented with a clear shot and note
A load plan can be flawless on paper and still fail during lifting, yard moves, and staging. The next section sets handling discipline so the unit stays within the handling limits that the load plan relies on.
What Handling And Staging Controls Prevent Pre-Dispatch Damage?
Most avoidable damage is introduced during lifting, yard transfers, and staging, not during linehaul. Standardize the rules below so each shipment remains within the serviceable condition your load plan assumes.
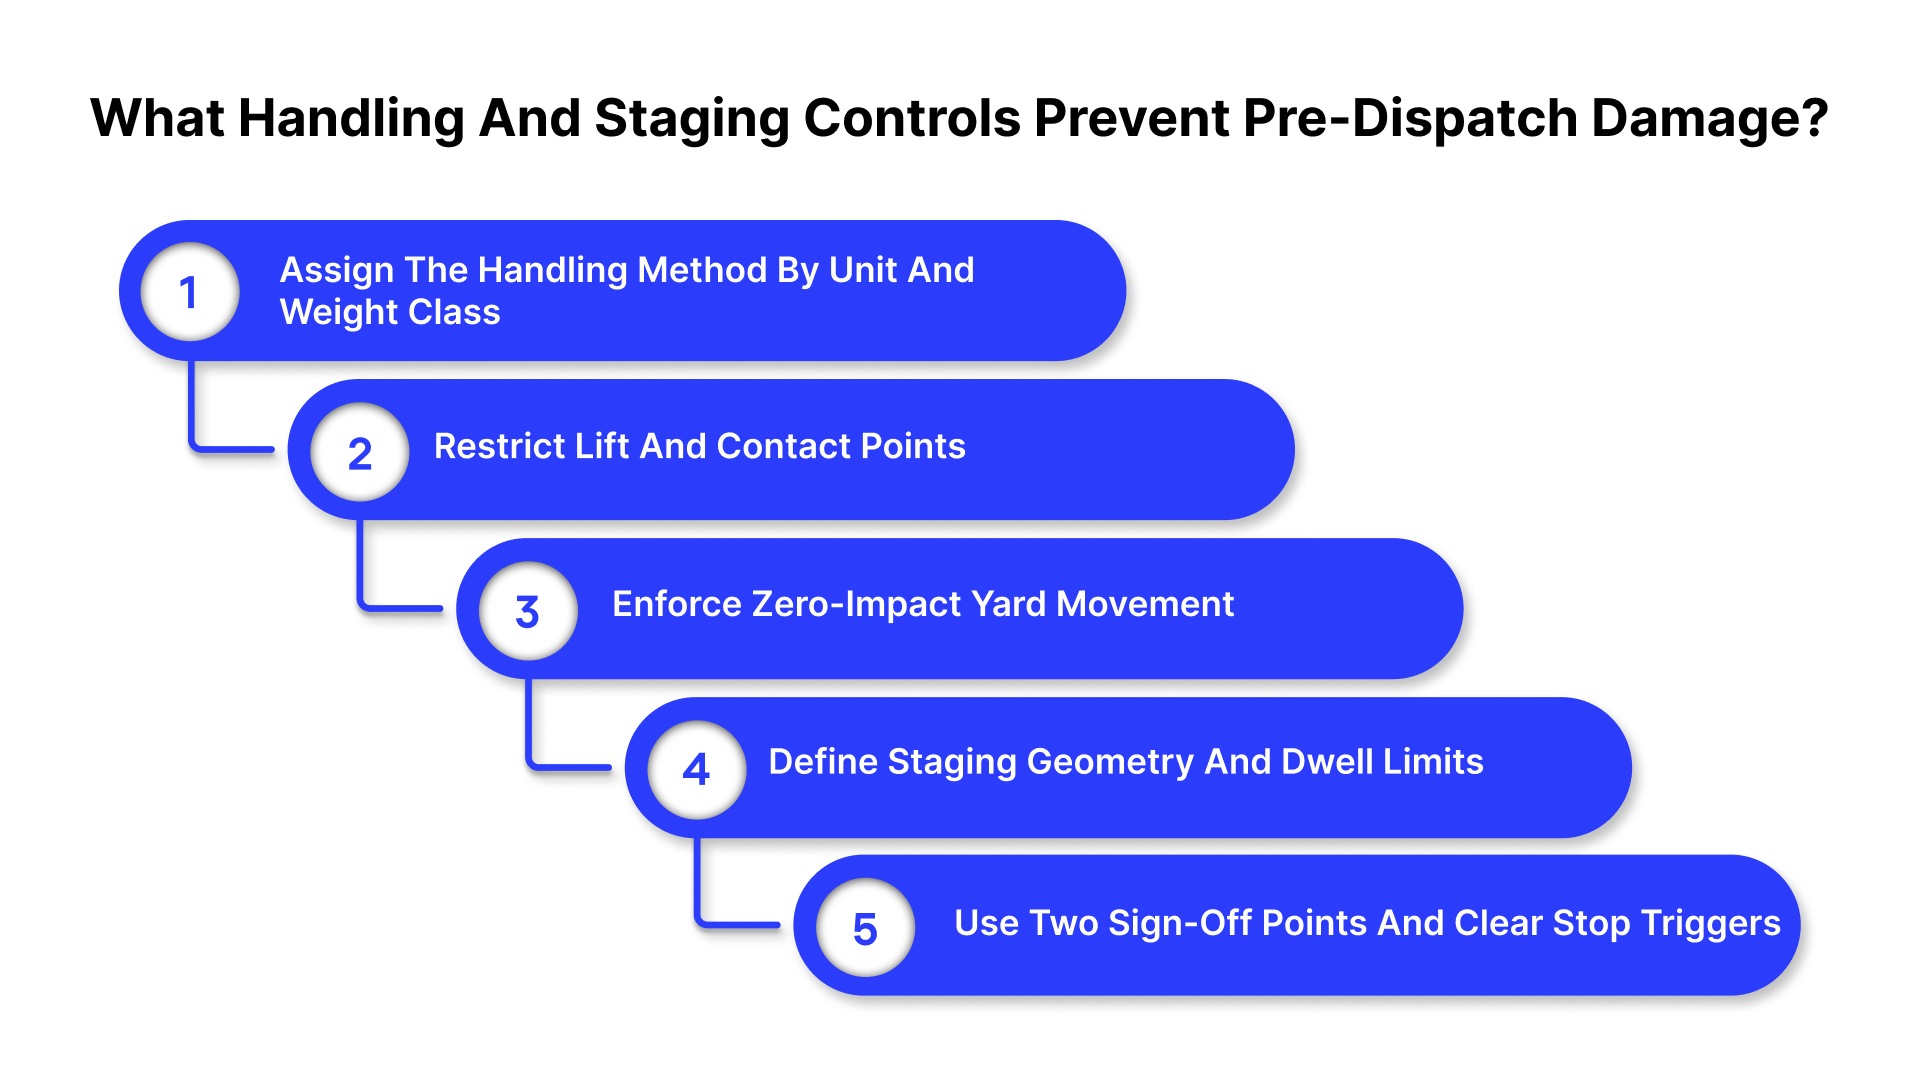
Assign The Handling Method By Unit And Weight Class
Assign the permitted handling method by shipping unit and weight class (reel handler; crane with shaft/arbor; forklift on skid/structure; coil-specific attachment; cut lengths on skids only).
Restrict Lift And Contact Points
Lift only from structural interfaces (shaft/arbor, rated lifting features, purpose-built attachments).
Prohibit lifting from flanges or rims and prohibit any bearing on the cable pack.
Permit fork contact only on skids or structural members, not on the pack.
Enforce Zero-Impact Yard Movement
Prohibit drops, bounce-to-seat set-downs, and any impact loading.
Prohibit uncontrolled rolling of reels. If controlled roll is authorized for a specific reel family, require a defined procedure and spotter coverage.
Treat dock plates, thresholds, and yard joints as strike-risk zones and manage crossings accordingly.
Define Staging Geometry And Dwell Limits
Stage on a firm, level surface and stabilize immediately.
Define the weather exposure requirement (covering/sealing expectations) and a maximum dwell time before re-verification.
Use Two Sign-Off Points And Clear Stop Triggers
Require sign-off prior to loading (condition verification) and after placement (condition and protection verification).
Stop release if any of the following are observed: flange wobble, rim deformation, crushed outer wraps, consistent jacket scuffing indicative of pinch/drag, or end damage.
What Carrier, Equipment, And Route Constraints Change The Transport Method?
A transport plan fails when it assumes the carrier and route will “work it out.” Heavy cable moves succeed when trailer selection, envelope limits, weight distribution, and permit timing are confirmed before pickup is scheduled.
Securement must also meet FMCSA cargo securement expectations for the load configuration. Treat this as a baseline requirement, then apply your program’s no jacket contact and no flange-loading rules on top.
Match Trailer Type To The Shipping Unit And Risk Profile
Trailer choice is not a preference call. It controls deck height, securement geometry, and whether the shipment can clear bridges and site access constraints.
Flatbed: Suitable when overall height stays comfortably under route limits and the shipping unit does not require low-deck clearance control. Use only when the load can be placed to maintain axle distribution without forcing an over-height build.
Step Deck: Use when deck height must be reduced to keep total loaded height under route constraints, or when stability improves materially with a lower center of gravity for tall reels or stacked units.
Removable Gooseneck (RGN): Use when weight, loading method, or deck height requirements cannot be met on a flatbed/step deck. Typical triggers include very high-mass reels, difficult placement requirements, or low-deck clearance needs that reduce exposure to height limits.
Enclosed/Van: Justified when jacket condition, contamination risk, moisture sensitivity, or security requirements make open-deck exposure unacceptable. Treat this as a risk-control choice, not a default.
Control point: If the load is only feasible on a specific trailer type, document it as “no substitution” so dispatch does not swap equipment on availability.
Screen Envelope Constraints Before Booking Pickup
Heavy cable shipments get delayed when a route review starts after the trailer is assigned. Prevent that by defining hard triggers for review.
Confirm, at minimum:
Loaded height (shipping unit + deck height + any blocking that adds vertical build)
Loaded width (including flange protrusion, coil restraint structure, and any side protection)
Loaded length (including overhang, if applicable)
Decision rule: Any shipment near height/width limits is treated as “route validation required” before carrier confirmation. This avoids last-minute rework, detours, or pickup refusal.
Confirm Weight And Axle Feasibility As A Carrier Requirement
Total weight alone is not the issue. Axle distribution and placement feasibility determine whether the carrier can legally and safely move the load.
Require the carrier to confirm:
Maximum payload for the trailer class being used
Placement plan feasibility to keep axle weights within limits (especially for single high-mass reels and mixed loads)
Tie-down capability availability for the booked equipment class (count and capacity), verified by dispatch
When the weight risk is material:
Require scale tickets or verified weight documentation for the shipping unit.
Treat multi-unit loads and mixed shipping units as “carrier sign-off required” because distribution is harder to manage without rehandling.
Plan Permit, Escort, And Scheduling Reality Up Front
Permits and escorts are operational constraints that can force changes in timing and exposure, which increase handling and staging events.
Confirm early:
Permit lead time and who is responsible (shipper vs carrier)
Escort requirements and availability windows, where applicable
Restricted travel windows that create predictable layovers (curfews, weekend restrictions, holiday limits)
Weather windows when exposure or road conditions materially increase risk
Decision rule: If the move requires permits or escorts, the schedule is a transport control. A delayed permit or missed escort window is not a “minor delay,” as it can add staging time and additional yard handling.
Issue A Shipper Documentation Pack That Carriers Can Execute
Carriers fail on heavy cable moves when they receive incomplete or inconsistent information. Provide one standardized packet.
Include:
Verified weights and dimensions (shipping unit included)
Declared shipping unit and any no-substitution requirements (trailer class, equipment constraints)
Pickup and delivery site constraints (dock access, yard access limits, appointment rules)
Required pickup/delivery equipment availability (forklift capacity, crane availability, unload method constraints)
A short handling limitation note that flags prohibited substitutions (example: “Do not pick from flanges/rims” stated as a constraint, not a procedure)
This packet exists to prevent equipment swaps, missing permits, and pickup refusals.
Use A Carrier Brief That Forces Confirmation Before Dispatch
A “carrier brief” is a pre-dispatch checklist. It creates a single confirmation record that prevents misunderstandings at pickup.
Require confirmation on:
Trailer type and deck height class
Permit and escort status (if applicable)
Planned route feasibility for the loaded envelope
Tie-down availability appropriate to the equipment class
Appointment windows and any restricted travel constraints
Any special requirements the shipper is enforcing (no substitution, escort timing, site access limits)
Outcome: The shipment is executable on paper and executable in the field, without relying on dock judgment or last-minute dispatch changes.
Receiving acceptance and disposition still determine whether the shipment protects the schedule. That requires a tight receiving checklist and clear stop triggers tied to a documented condition.
What Receiving Checklist Prevents Downtime, Claims Disputes, And Surprise Unusable Reels?
Receiving is where transport quality becomes measurable. The goal is a fast disposition decision backed by proof captured before the unit is moved.
Dock Checklist: Inspect, Document, Decide
Inspect first:
Reel condition: flange out-of-plane, rim deformation/flat spots, wobble indicators, cracks.
Pack condition: crushed outer wraps, abrasion bands, strap bite, loose wraps, evidence of shift.
Protection + ends: wrap/cover integrity, edge protection present, end seals/caps intact, IDs readable.
Moisture risk: breached barriers, wet packing, exposure signs on long-haul or outdoor deliveries.
Document before unloading:
Two-angle overall delivery view
Flange/rim close-ups (both sides if accessible)
Pack close-ups (any scuff/crush areas)
Ends + labeling/IDs
Any damage with trailer/deck context
Decide disposition immediately:
Accept: no damage indicators, protection intact, IDs match paperwork.
Accept with note: cosmetic issues only; documented and tracked.
Quarantine: any risk to payoff, structural integrity, ends, or moisture barrier.
Reject/claim: confirmed nonconformance or unsafe condition.
Make It Claim-Ready At The Dock
Include: delivery notes on the BOL, the photo set, ID confirmation, and weights only if relevant. Avoid clean signatures when damage is visible.
Escalation Rule: If quarantined, assign one owner and a decision SLA (same shift or within 24 hours) so the shipment does not turn into silent downtime.
Close The Loop: Log issues by reel family, vendor/carrier lane, damage signature, and disposition to identify repeat patterns and trigger corrective action.
When repeated issues persist under controlled loading, handling, and receiving, reel condition variability becomes the limiting factor.
When Repeat Damage Points To Reel Condition, Not The Transport Method
If transport steps are controlled but you still see recurring flange/rim damage, wobble, or inconsistent reel behavior across “same” reel families, the constraint is often reel condition and repairability.
Decision Triggers That Indicate A Reel Condition Problem
Recurring issues usually show up as the same damage signatures across lanes and sites, even when load plans and handling rules are followed:
Flange deformation or out-of-plane flanges that create wobble, strap misseating, or repeated edge strikes.
Rim damage or flat spots that prevent stable seating and increase impact risk during yard moves and placement.
Imbalance or “walk” behavior that makes a reel unpredictable during controlled movement and staging.
Arbor or drive feature wear (arbor tube damage, drive pin hole wear, interface distortion) that creates handling and run instability even when the cable pack is fine.
How NARCo Addresses These Failures
This is most relevant when the limiting factor is reel geometry, interface integrity, or repeatability across a reel family:
Restore geometry: straighten/press flanges and correct deformation that drives wobble and strike risk.
Repair rim damage: address rim impacts or edge damage that prevents stable seating and increases movement risk.
Recondition for repeatable service: blasting and painting to support controlled re-entry and reduce corrosion-driven degradation.
Re-mark for control: stenciling (ID/logo and/or tare weight) so repaired reels remain traceable in program workflows.
Stabilize dynamic behavior: dynamic balancing when instability is contributing to handling or staging risk.
Repair critical interfaces: repair/replace drive pin holes and arbor tubes, adjust arbor hole size when required, and perform welding/fabrication/machining as needed to restore return-to-service integrity.
If your highest-volume reel families are generating repeat exceptions, request a technical review from NARCo focused on repair scope, stabilization thresholds, and retire/return recommendations by reel family.
This keeps corrective action governed, rather than handled through repeated local workarounds.
Conclusion
Transporting heavy cables reliably is not a “carrier problem.” It is a controlled method that starts with the shipping unit decision and ends with a documented receiving disposition.
When those two points are standardized, the middle of the move becomes predictable: the load plan specifies orientation, restraint, and protection; handling rules prevent flange hits and crushed wraps before the truck leaves; and carrier and route constraints are screened early enough to avoid rejected pickups, rework at the yard, and uncontrolled dwell time.
Use this guide to turn transport from a series of one-off judgments into a repeatable program standard. If repeat damage persists even when those controls are followed, treat it as a reel condition issue, not a planning issue, and shift the corrective action to repairability, reconditioning, and retire/replace decisions at the reel-family level.
FAQs
How Do You Transport Cable Reels Safely?
Standardize the reel orientation, prevent roll with chocks/cradles, restrain without loading flanges or biting the jacket, and capture a dispatch photo set before release.
Do Cable Reels Need To Be Transported Upright Or On Their Side?
It depends on the reel family and shipment profile. Choose one approved orientation per reel family and document the matching blocking and restraint method.
How Do You Prevent Cable Reels From Rolling On A Flatbed?
Use purpose-fit chocks or cradles that seat the reel, then add restraint that resists rotation and translation. Do not rely on straps alone to stop rolling.
What Causes Cable Damage During Transport Besides Tie-Downs?
Handling and staging. Flange strikes during picks, crushed outer wraps from point loads, end damage, and water ingress during dwell are common failure modes.
When Do Heavy Cable Shipments Require Permits Or Escorts?
When the loaded configuration exceeds the legal envelope or axle limits. Screen trailer type, route constraints, and weight distribution before the pickup is scheduled.
What Should Receiving Check On Arrival For Heavy Cable Reels?
Flange and rim condition, wrap integrity, correct ID/labels, end protection, and any signs of moisture, deformation, or impact document evidence before unloading.